Back Flexibility Drills for Zouk Dancers
Photo credit: Zoukology (Dancers: Dani Enos & Brad Meccia)
A common question I get from other zoukers (especially followers) when I tell them I am a flexibility coach is “How can I improve my back flexibility for dancing?” As you’ve probably already experienced, zouk is very much a “full body” dance, so when your flexibility limits your range of motion, it can become a bit uncomfortable (especially with moves that require quite a bit of spinal flexibility, like body waves and head movement).
If you only had time to focus on ONE area of flexibility for zouk dancing, it should be stretching out your thoracic spine, aka your upper back. In zouk, we really put our upper back through the ringer, requiring it to move in pretty much every range of motion possible:
Spinal flexion (rounding forwards) & extension (backbending)
Examples: rounding to the front or arching to the back in head movement, body rolls, raúl, elastico
Spinal lateral flexion (sidebending)
Examples: side snakes, tilted turns, tilting to the side in head movement
Spinal rotation (twisting, sometimes referred to as “torsion”)
Examples: every time we twist (which should be happening any time you are prepping any kind of turn)
The upper back is often a challenging area for zoukers to tackle because:
Our upper back is naturally rounded (whereas our neck and lower back are naturally arched), and is frankly not designed to arch as much as the rest of our spine (Pssst - I wrote a whole blog post that goes into this in more detail if you’re curious: Why Your Upper Back Sucks at Backbending (and How to Make it Suck Less))
Few other hobbies train upper back flexibility/mobility, so most students are starting with a limited range of motion in their thoracic spine to begin with
So if you feel like your upper back is stiff as a board, you’re not a lost cause - that’s common (and fixable)!
And lucky for you, one of the best ways to increase thoracic spinal extension (backbending through the upper back) is to also work your upper back in the ranges of motion it’s better at moving in (twisting and sidebending) - so working on all these ranges of motion will give you the most bang-for-your-buck when it comes to flexibility training.
So let’s review a couple of stretches and drills that you can incorporate into your own training a couple of days a week to help improve your upper back flexibility/mobility for zouk (as well as other slinky dances, like sensual bachata, or pole).
You’ll notice I’ve included a mix of passive (relaxed) and active (muscles contracting!), as well as static (non-moving holds) and dynamic (moving through a range of motion) exercises because all of these are helpful in terms of increasing our range of motion for dance.
And these drills aren’t just for zoukers! Any dance that uses slinky spinal motions, like sensual bachata, pole dance, or heels floorwork can all benefit from a bit more thoracic spinal mobility :)
Twisting Drills
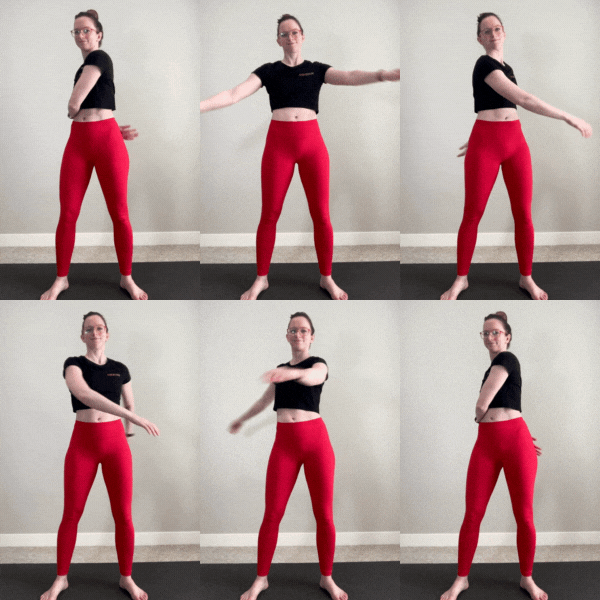
1. Standing Floppy Arm Twist
This is a great one to do early in the warmup because you can use the momentum of your arms to (gently!) pull your body into a deeper twist.
Start standing in a comfortable position
Twist your torso to one side, swinging one arm in front of your body, one arm behind (let the arms just flop, nice and relaxed)
Then twist to the other side
Keep going side to side, letting the momentum of the arms carry you from one side to the other
You’re welcome to let your hips pivot as well if that feels good. You can also add a forward fold by hinging at the hips, turning this more into a “windmill” twist, with one arm swooping towards the floor, the other towards the ceiling.
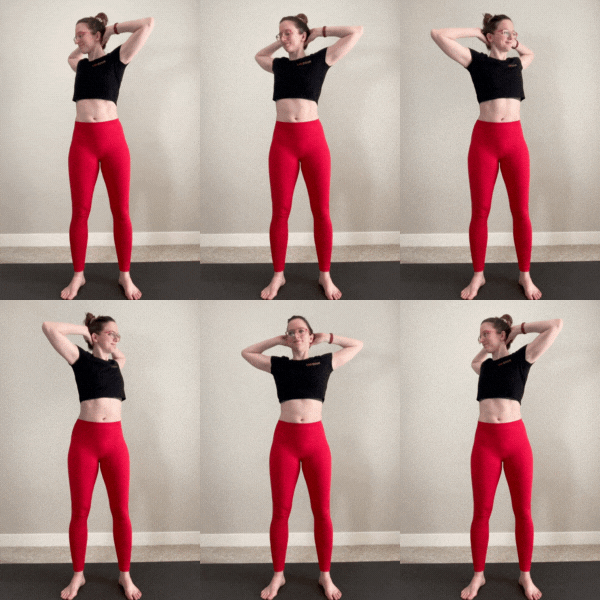
2. Standing Active Twist
Now it’s time to make the twist more challenging by removing the momentum provided by the arms, and eliminating the twist through the hips. This is a great example of an active dynamic drill, one where you are engaging your muscles to go through a range of motion (just like we do in dance!).
Start standing in a comfortable position. Cross your arms in front of your chest (you’re not allowed to use those arms to “help,” so we’re taking them out of the picture)
Keeping your hip bones pointing forwards, twist as far as you can to the left. Don’t let your hips twist to the left! They should stay pointing forwards like headlights. Hold for a second or two
Then twist as far as you can to the right
Continue slowly twisting side to side, keeping your hips pointing forwards the whole time
3. Thread the Needle
This is another twist I like, and it has the added bonus of incorporating a chest stretch as well (which can be helpful for folks with slouchy, forward-rounded shoulders that we want to un-slouch for better dance posture)
Start kneeling on all fours with your hips stacked over your knees
Reach your left arm up towards the ceiling as you twist your chest open to the left (make sure your hips stay stacked over your knees and don’t start to drift to the side). If you want an extra chest stretch, think about pushing the right hand into the floor while you reaaaaach your left arm up and backwards, spreading your “wingspan” as wide as you can as you twist
Then scoop your left arm down toward the floor, “threading” it between your right arm and thigh, dropping your left shoulder to the floor. Optionally, you can stay in this twist and lift your right hand up and back to add a chest stretch on the right side (not shown).
Press into the right hand to “unthread” the left arm back to your starting position
Repeat for 5-8 reps on one side, then switch sides
Sidebending Drills
When it comes to spinal lateral flexion (sidebending), we typically try to only sidebend from the thoracic spine (upper back) in things like tilts and head movement, but can also choose to take it deeper into the lumbar spine (lower back) for things like side body waves. It’s important to have the control to be able to choose which part of your spine you are looking to bend, so for the following drills I would encourage you to intentionally limit the range of motion just to the upper back to practice that control.
4. Standing Side Bend (with Hand Support)
Start standing (or kneeling) with feet hip-width apart
Plant your left hand on your hip and reach your right arm overhead as you tilt to the left. Think about reaching the outside of your right armpit up towards the ceiling (more “up” through the torso, less “side crunch towards the floor”). If you get tingles in your right hand, you can keep the sidebend and just drape the right arm over your chest
Hold for ~20 seconds, then switch sides
To keep this stretch focused on the upper back, it’s important to make sure you’re not accidentally sidebending in the waist - watch yourself in a mirror and try to keep your waist upright. If the cue “lift the armpit towards the ceiling” doesn’t work for you, you can try taking one hand to the bottom of each side of your ribs and try tilting your upper body to the side, but without either side of the bottom of your ribs lifting or dropping too much (a small amount of movement is OK). Try to keep the same amount of space between the top of your hip bones and the bottom of the ribs on each side as you tilt!
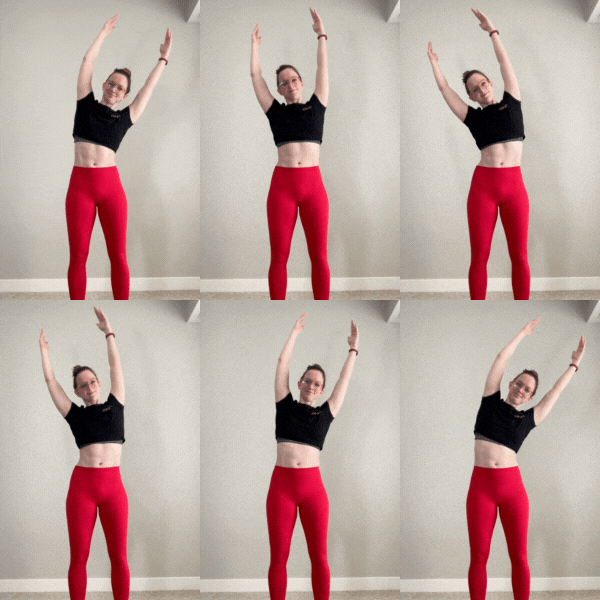
5. Standing Active Side Bend
Now it’s time to make that last drill more challenging by making it more active: taking the hand support away so we need to use more of our obliques to moderate the bend.
Start standing (or kneeling) in a comfortable position
Reach both arms overhead and slowly tilt to the left. Think about reaching your collarbone UP towards the ceiling as you tilt, and not doing a side crunch DOWN towards the floor. Make sure your hips stay stationary and aren’t drifting side-to-side
Hold for a couple of seconds on one side, then slowly tilt to the other side
Just like with the previous exercise, we want to make sure this sidebend isn’t coming from our waist. So watch yourself in a mirror, film yourself, or do a couple of reps with your hands on your bottom-most ribs to make sure you’re not crunching down in the waist.
What if you want to work on lower back sidebends (for slinkier side snake-y movements)? You can absolutely do these drills with a deeper tilt (where you continue to lean until you are tilting more from the lower ribs and waist) - just make sure that is an intentional choice and you are able to differentiate between a “just upper back tilt” and “lower back tilt”
The Big Kahuna: Back (and Front) Bending Drills
Now for the real challenge: helping our upper back ARCH! We’ll start with using some props for support, then we’ll practice moving through that same range of motion without the support.
6. Cat-Cow With a Band
Cat-cow is a great warm up for the spine, but it’s easy for students to let their low back do most of the arching work in this pose. Adding a stretchy resistance band can help give our upper back a gentle push to join the backbending party!
Kneel on in a tabletop position with a resistance band stretched across your upper back, right at the base of your shoulderblades. Pull the strap taught and anchor it to the floor with your hands so it is tugging your ribs towards the floor
Arch your back by lifting your tailbone, letting the band pull your mid ribs towards the floor as you scoop your chest forwards and lift your head
Then round your back by tucking your tailbone, tucking your chin toward your chest, and pressing your upper back into the resistance band (note: don’t worry about maximally rounding your back - it’s possible to round it so much that the strap slips and smacks you in the back of the head, which is no fun!)
Repeat, arching (“cow” pose) and rounding (“cat” pose) for 8-10 reps
7. “Sad Dog” Cat-Cow (aka Cat-Cow with Tailbone Tucked)
Now we’ll try that same movement, but without allowing the low back to arch: meaning the upper back is the only part that can contribute to the backbend! You can choose to keep the resistance band at the base of your shoulder blades (just like the Cat-Cow drill above), or try this without the support band for an extra challenge.
Start kneeling in a tabletop position (optional: with a resistance band stretched across the base of your shoulder blades like in the drill above)
Tuck your tailbone towards the floor (if you were a dog and had a tail, this would be like tucking your tail between your legs). We are going to keep that tailbone tucked for this whole exercise like you are a “sad dog” :(
Keeping the tail tucked, try to go through your cat-cow arching and rounding: dropping the mid ribs as you scoop your chest forwards and up, then rounding by lifting the ribs
Repeat for 8-10 reps total
This should feel considerably more challenging than your regular cat-cow! Don’t worry if this is a small movement, or if your upper back isn’t actually arching just yet - that range of motion will increase over time.
8. Booty Drops on Blocks (or a Chair)
This drill is actually my favorite upper back drill, period. If I only had time to do ONE drill - this would be it! I’ll even actually do this at a zouk social as part of my pre-dance warm up (because my body is old/cranky enough now that I do actually have to warm up before social dancing) or when I’m taking a break.
You can do this drill leaning over a foam roller, a coupe of yoga blocks, or a chair / low table / bench.
Start leaning backwards over your support prop, with the edge of the chair/block/table/foam roller right at the bottom of your shoulder blades (this placement is important, usually it’s easier to place it lower down your spine on your mid-back, but we want to keep it on our upper back to encourage that tricky part of our spine to bend!). If you are on the floor, start with your hips lifted, and cradle your head in the hands to support your neck, with elbows pointing towards the ceiling. Let your head and top of your shoulders fall back as far as is comfortable so you are starting with a tiny backbend. If you are on a chair, grab anywhere on the chair that’s comfortable and point your elbows towards the ceiling (you may need to chuck your chin depending on how much space is between your head and the back of the chair)
Keeping your head & shoulders in the same spot (don’t let them lift/lower), start to drop your butt towards the floor, and pull it backwards in space, as if you were going to pull it towards the bottom yoga block or underneath your chair. Make sure this action is coming from using your back muscles to pull (it should feel like a squeeze in your mid back), and not using your feet to push your butt backwards.
Hold that squeeze for a second or two, then press the hips back up to your starting position
Repeat for 8-12 booty drops
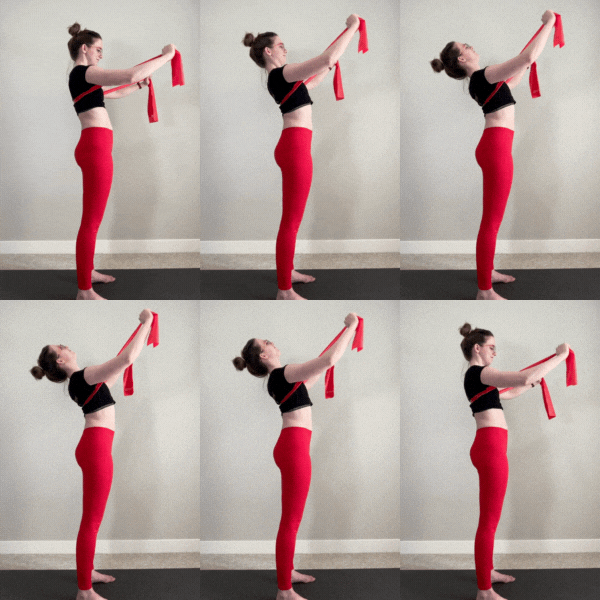
9. Standing Band-Supported Back Extension
Now it’s time to apply our flexibility work to a shape we actually use in zouk! First we’ll use some support to help, and then we’ll try this same cambre with just our muscles controlling the backbend.
Note: now that we are doing an upright backbend with the weight of our head and upper body being smooshed down by gravity - this takes considerable more muscle engagement to control than our previous backbends, so these drills will feel harder than the previous exercises. Film yourself to check your form to make sure you aren’t bending from your low back, letting your hips drift forwards or backwards, or doing anything funky with your arms/shoulders. It can also be tempting to try to squeeze our shoulder blades together to “push” our chest forwards - but that does not actually help us arch our upper back! So try to keep your shoulder blades in the same position (not overly retracted and squeezing together, nor protracted and reaching forwards towards the sides of your ribs - somewhere neutral in between) as you are working on these movements:
Start standing with feet hip-width apart. Stretch a strap across the base of your shoulder blades (the section of our upper back we are trying to coax to arch!) and tug it taught by stretching it forwards with your hands out to the sides. Make sure the strap is on the inside of your upper arms between your arm and armpits (it won’t give you as much support if it’s stretched across the outside of your upper arms)
Initiate your cambre motion by lifting your chest (nipples to the gods!), using your arms and the strap to help support the weight of your upper body as your upper back is arching. Make sure your hips stay stationary, don’t let them drift forwards or backwards (which will push some of this bend into your low back), and keep your arms in the same position relative to your upper torso (don’t reach them overhead - maintain your frame) You can let you neck arch if that feels comfortable, or keep your chin tucked as you practice this backbend if your head feels too heavy
Hold for a moment or two, then return back to your starting position
Repeat for 8-10 reps
10. Standing Back Extension
Time to take off the training wheels! This is the same drill as above, but without the strap support.
Start standing with feet hip-width apart. I like to have my arms out to the side, elbows bent (as if in an open dance frame)
Keeping your hips in the same spot, lifting through the waist, lift your chest towards the ceiling as you let your upper back arch back (you can even think about pulling your upper back away from an imaginary strap underneath your shoulder blades). Remember to lift UP through the chest, not smoosh your back DOWN by leaning backwards towards the floor. If it is comfortable on your neck, you can let your head fall back as well
Hold for a moment or two in your cambre position, then lift back up to standing
Repeat for 8-10 reps
10-Min Follow-Along Routine
Check out the video below for a 15-minute follow-along back flexibility routine to work on all these drills:
Pssst - you could totally do this before your next dance practice. Give it a try and see how zouking feels after!
Want TO Learn Even More?
On-Demand “Flexibility for Zouk” Workshop
For folks looking for a longer routine, I’ve also recorded a 60-Min Flexibility for Zouk workshop over on my Dani Winks Flexibility website. This follow-along routine includes even more emphasis on upper back flexibility (because it is so dang challenging!), as well as active flexibility drills for the neck (useful for more comfortable head movement and cambres), hips (mainly focusing on hip extension, the most common range of motion dancers typically lack), and ankle conditioning.


