6 Tips to Improve Your Brazilian Zouk Footwork
One of the most common questions I get when teaching zouk privates or classes is “how can I improve my <insert-technique-here>?”. We can fill in the blank with several common options: balance, turns, smoothness, head movement, etc. What’s interesting is that the answer almost always starts at the same point: footwork. If your footwork isn’t clean, you essentially have no hope for the move going well (or at least really well). Footwork is what connects us to the floor, it’s where a majority of our momentum is generated from, and it’s what gives our dancing predictability to our partner. While on the surface, this realization can be frustrating (I’ve been dancing zouk for more than 7 years and I still get feedback on things to “fix” about my footwork in private lessons…), it’s actually encouraging! It means if we focus intensely on improving our footwork, we can get a huge ROI on our training time and can make big strides in how our dancing feels and looks. It’s the foundation that so many other zouk techniques are built off of.
So here are the six most impactful zouk footwork technique tips I’ve learned on my dance training journey - if you can master these fundamentals you will be a much more balanced, clear, and responsive lead or follow.
1. Project before you step
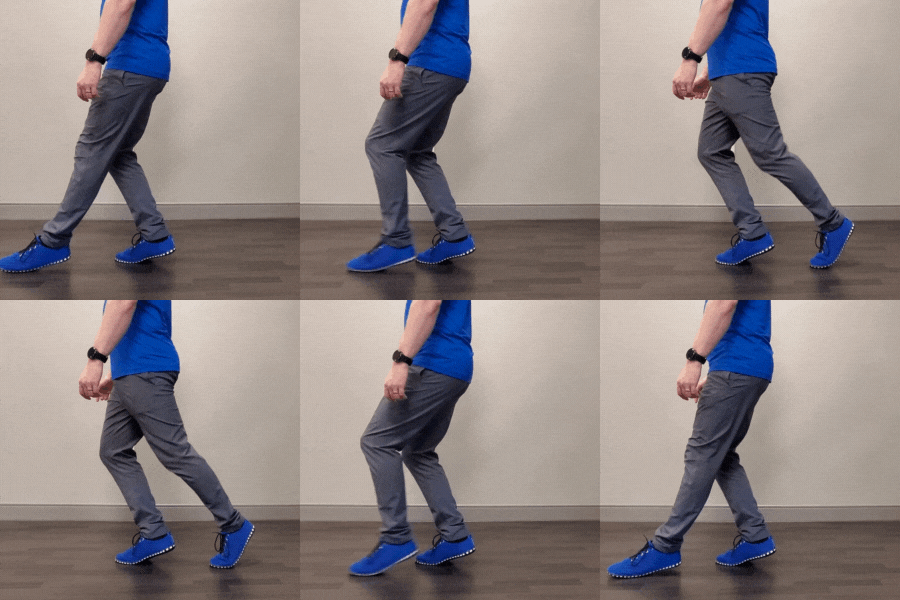
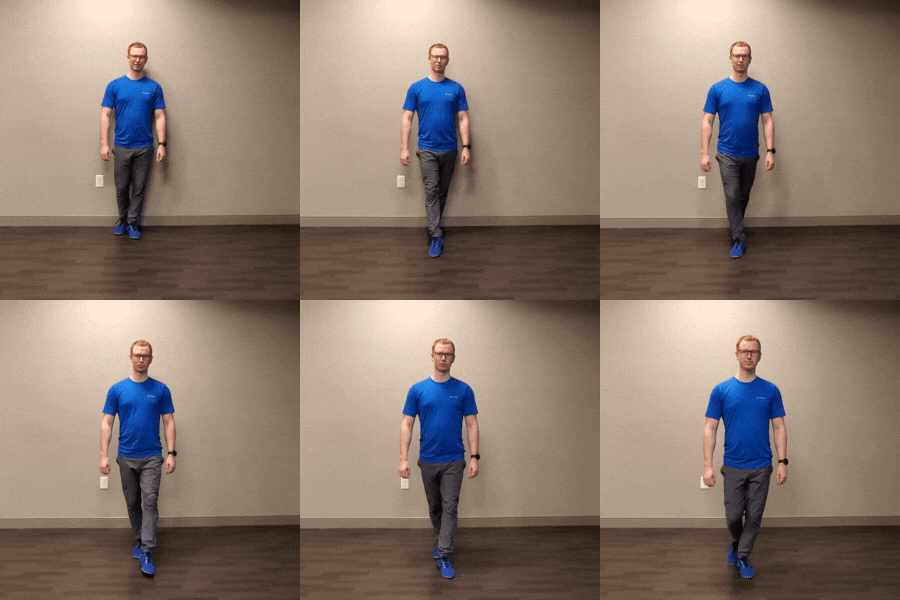
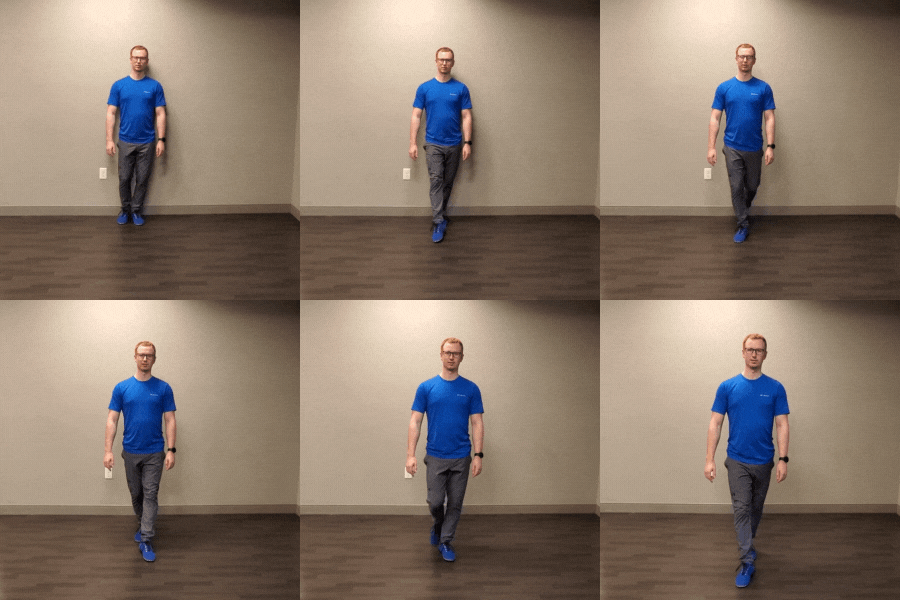
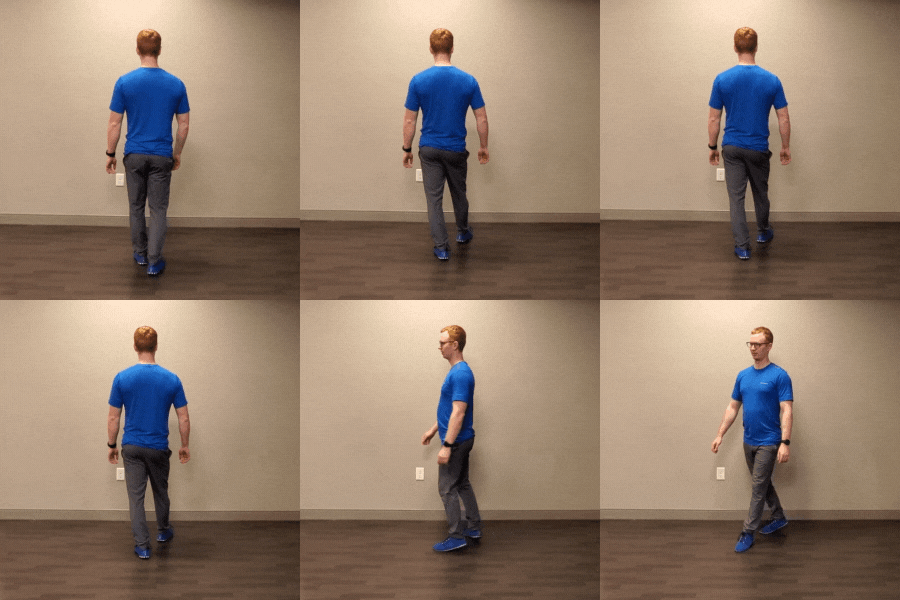
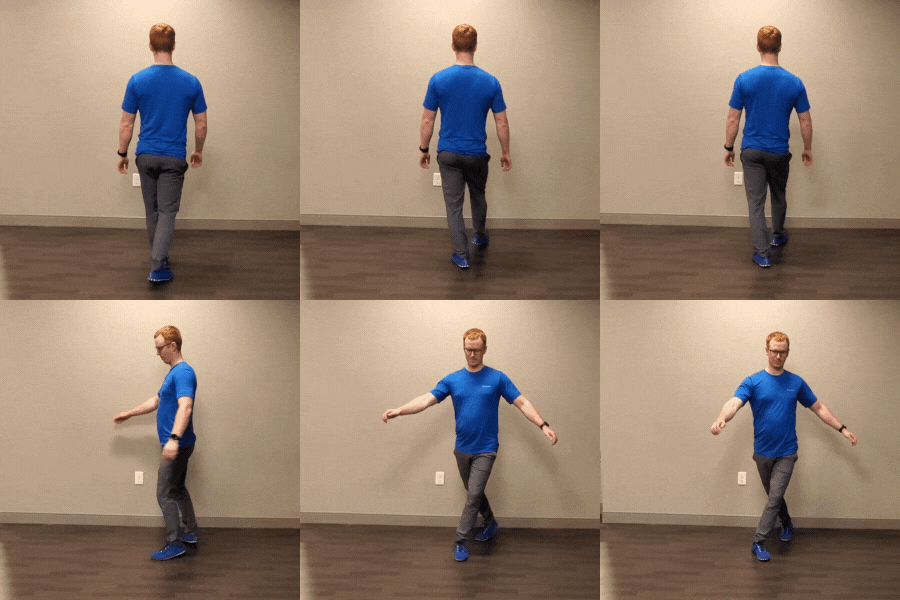
Zouk has a unique way of moving compared to most dances. It’s also different from how we generally walk in our day to day lives. In zouk, before we take a step, we “project” our foot by reaching it forwards (or backwards), extending it along our travel line before we shift any weight into our projected foot. See below for how we fully project the leg before any weight if shifted onto it:
Projecting while stepping forward
Projecting while stepping backwards
Projecting while stepping sideways
The reason we do this isn’t just aesthetic (although it does make nice “lines!”). Projecting the foot out first gives us a lot of control over where our weight is. It enables a very smooth weight transfer from one foot to the other and gives us improved balance.
Ever notice how if you’re walking down the street and your foot gets caught on something you start falling towards your face? That’s because in normal walking we tip our balance forward to the point we have to step to not fall. Walking is actually a controlled fall forwards, where we are catching our feet underneath us as we walk. This is very efficient, but isn’t ideal when dancing zouk.
Instead, by projecting our feet in zouk we have complete control over our weight and balance, so we’re much less likely to fall over (even if our foot gets caught on something). This enables us to shift our weight gradually. We shouldn’t feel like our weight goes from 100% on one foot on one beat and then suddenly jumps to 100% weight on the next foot on the following beat. Instead, we want to gradually shift the weight onto the projected foot, starting at 0% weight, then 1%,2%,3%... and so on until we’re fully transferred. Our weight shifts should always feel continuous and not discrete.
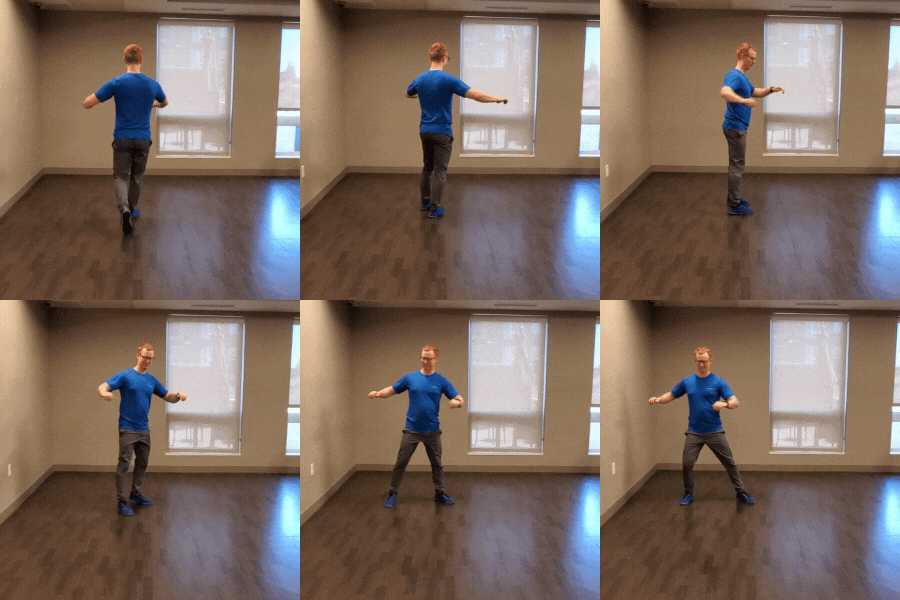
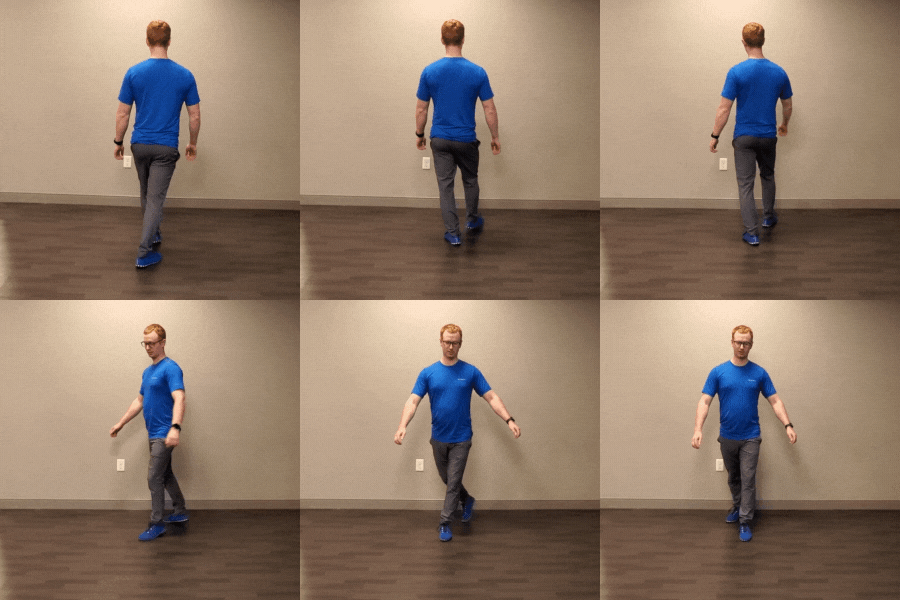
Recommended Drill: Foot Projection and Collection
Here’s one of my favorite drills to work on projection:
I recommend practicing very slowly, starting with songs at 30-60bpm and then once everything feels good, slowly increase the tempo so you can use this technique during a normal tempo song (roughly 80 bpm). Eventually you should be able to apply this style of stepping to every step during a dance.
2. Collect the feet
The natural corollary to projection is collection, bringing the feet back underneath our torso. If we want to be able to have a nice projection with the leg before we shift our weight, then we also need to be able to collect our foot when we no longer have weight on it (and not leave our leg hanging out in limbo land).
The most common issue with collecting the feet are
Collecting too fast, instead of collecting at the same speed we project and travel
Cutting corners when we change our line, for example when going from lateral into a lunge:
Bad collection and cutting the corner
Good collection, no corner cut
Note: it is possible to do this same movement without collecting and still have it be correct, collecting just helps ensure the weight is entirely transferred to the single foot.
My favorite drill to work on collecting the feet is actually the same drill to work on projection mentioned above!
3. Roll through your feet
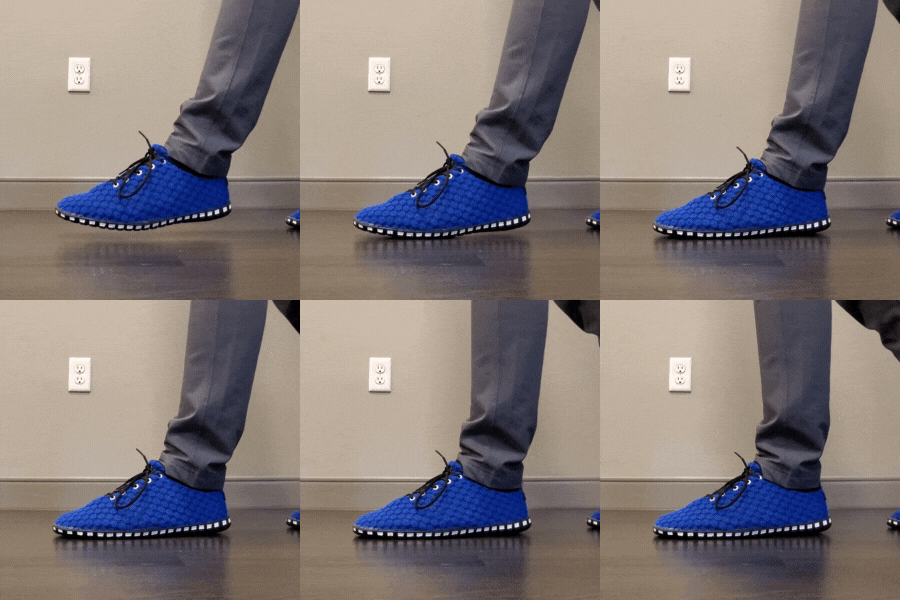
Striking with the ball of the foot/toe
Striking with the heel
Striking with a flat foot
“Rolling” through your feet refers to how we can choose to strike the floor with the ball of the foot and then use the calf muscle to control the heel lowering to the ground (so toes-then-heel). In addition to projection, this further helps smooth out footwork and controls our weight transfers. A good goal is to make the roll so smooth that our partner can never feel our heel strike the ground or feel any sudden changes in height or speed.
Note: While toe-striking is a good default, there are times where heel striking may be a better choice (for example, heel strikes are much more common during more hip hop-style of songs).
Recommended Drill(s): Relevés
A great drill for improving this is relevé drills. This is my favorite youtube video for working on foot conditioning (shout out to Kuna for the recommendation), following along is a great way to build strength and balance and makes rolling through the foot much easier.
4. Keep your weight in the ball of the feet (don’t let it dump into the heels)
This is probably the most common mistake I see followers doing when they dance (even intermediate follows!): letting all of your weight dump/fall into your heel when dancing:
Dumping weight into the heel
Even if you are properly projecting your foot and using the “roll” through your foot to soften your step, if you then let the weight fall into the heel it can cause a glitch in traveling.
Ideally in zouk, followers should strive to keep the weight in the balls of their feet (even when the heels are touching the floor). Why does this matter?
Because we turn on the balls of our feet in zouk, that means keeping the weight in the front of our foot makes us more responsive to pivot and turn at any point in the dance. If we’ve already fallen into our heels, we have to shift our weight to the ball of our foot first before we can pivot (it may seem like a small delay - but it matters!)
Staying on the balls of the feet smooths out our traveling (a common theme for footwork tips). If we wait until the wait is in the ball of our back foot to start projecting there will be this small moment where it feels like we’re falling backwards and have to step back with the free foot to catch ourselves. This will show up as a glitch in the travel and will keep it from being smooth. This is especially pronounced in close embrace traveling, or when we are traveling backwards
It makes the follower more responsive and more likely to stay on the beat. If you are always dropping into your heels (and then creating a tiny delay before you can project the next step or pivot), this can cause an accidental delay in the following and lead to some minor “bumper cars”
This is typically most challenging when traveling backwards. While projecting backwards it’s tempting to let the weight go from the ball to the heel of the back foot as we collect the front foot and then start to project it backwards. Instead, what we should be doing is starting our projection earlier while our weight is still in the ball of our back foot.
Keeping weight in the ball of the foot while projecting backwards
A good test to see if the weight is in the correct spot is to put your weight bearing foot into a slight releve since this can only be done when the weight is in the ball of the foot (I don’t recommend dancing like this, it’s just for demonstration):
Projecting while in a slight releve
To practice this I just like to work on walking backwards slowly with projection, really focusing on keeping my weight on the ball of the foot as I project and travel backwards.
5. Soften the knee when bearing weight
There are actually several schools of thought about how straight vs. bent the knees can/should be in zouk, and a lot of it comes down to how we absorb weight in our body. In one camp there are dancers who prefer to use a “hip settle,” where we allow our hips to tilt slightly as our weight shifts over our foot:
Stepping with the hip settle
Another preference is to use the “bent knee settle.” In this case the hips are kept more level and instead the knee is bent when it starts to hold weight.
Stepping with the knee settle
Here’s how to do the “knee settle” yourself:
Start standing with the weight in your left foot (keeping the left knee soft)
Project the right leg forwards (keeping the knee straight) - this not only makes a nice “line” (looks good), extending the leg all the way out straight makes your step size predictable to your partner!
As you shift your weight towards the right foot, soften the right knee to absorb the weight, pressing off of the left foot with a straight left leg (once the left foot is no longer bearing weight)
How much knee bend? It depends! This is something we’ll talk about in a future blog post when we get into “A and U movement” and using level changes in our dance - for now, just try to keep a small amount of knee bend
Collect the left foot forwards
Personally, I spent my first several years dancing using the “hip settle,” and over the past year have transitioned to using more of the “knee settle.” I find the knee settle to be more comfortable on my hips and it makes me feel more grounded and balanced since my leg muscles are more activated when my knee is slightly bent.
So, if you have had any issues with balance while walking or turning, I recommend giving the knee settle a try and see if it helps!
6. Step in a straight line
This is perhaps one of the most counter-intuitive tips for beginners who aren’t used to dancing between another human being’s legs (which is fair!).
A common instinct when partner dancing is to keep your feet hip width apart (or wider) to avoid accidentally kicking your partner.
But there’s no need to John Wayne your legs out like a cowboy, in fact it will make it even harder to pivot and step predictably if you are always stepping with your feet wide.
The “John Wayne walk” (feet hip width apart)
Instead, whenever possible we want to step on a straight line, projecting and stepping our feet straight in front of our belly button with the balls of the feet aligned (almost like walking a tightrope).
Stepping on a line
The reason we do this is when we pivot on both feet we want to be able to do a 180 and face the other direction without replacing our feet. If our feet aren’t on a line you’ll either end up on an unintentional line, with pretzel legs, or will have to replace your feet to fix it.
Wide step causing a bad line
Wide step causing an over-rotation (pretzel legs)
Wide step causing a foot replacement
The exception to this is if we’re in close embrace and our partner’s leg is in the way. In that case we step as close to our line as possible but will compensate a bit to give the partner room. Generally this will lead to our inner leg having contact with our partner’s inner leg.
“But Nate - I just tried walking in a straight line, and it was super hard - I feel like I’m going to topple over!” Honestly, learning to walk in a straight line is frankly one of the most humbling experiences in zouk, because it’s so different from how we naturally walk in day-to-day life. But what we can do to gain some more stability is to engage our hip external rotators.
Instead of stepping with totally parallel feet, we step with a slight external rotation (aka “turn out”) to the leg. How much rotation? I asked William Teixeira in a private recently and he had some great general advice: Stand normally/comfortably with your feet together. Take a look at how much your feet/legs choose to turn out:
Comfortable amount of external rotation
“That’s how much rotation we want when stepping on our line”:
This external rotation is mostly for balance. Standing on a line with feet faced perfectly forward gives us a very narrow base to balance on. Externally rotated feet give us a wider base and thus better balance. There’s also the benefit it gives to our glute engagement which is crucial for good turn technique. We’ll dive into the glute engagement more in a future post on tips for turn technique.
And that’s it! 6 tips I’ve found to be the most helpful to improve footwork in zouk along with some drills on how to improve them. I hope they help you as much as they’ve helped me! Did we miss any big tips you’ve found helpful? If so, let us know below!
Final Thoughts:
Does this apply equally to both leads and follows?
Sort of. Personally, my belief is every dancer benefits greatly from improved footwork. That being said, the above tips are admittedly more important for followers: helping drill footwork technique to make them the most balanced, controlled, and responsive follows they can be! For leads, on the other hand, there are more practical opportunities to break these “rules.” For example, leads don’t always project their legs before shifting weight. In close embrace if we want to have the follow step backwards generally we need to shift our weight forward before we can start our projection so we don’t kick our follows. Instead, I recommend leads view the above list as a default set of guidelines that we deviate from when a specific move calls for it. I’ll go into more specifics about lead footwork in a future blog post so keep an eye out for that!
Want to learn more about improving your zouk footwork?
If you’re ever visiting Minneapolis, drop into one of our classes at AmoZouk! In our group classes we integrate these 6 tips in our warm up. We’ll demonstrate them and give you feedback during the class (or provide one on one feedback if you invest in a private lesson).
And if you’re a super nerd like me and want a deep technical dive into lead and follow technique including footwork, check out Bruno & Raiza Improvement Course (BRIC) Level 1 - they do an amazing job of breaking down the fundamentals of zouk technique and it’s where I learned many of the above tips. I highly recommend it as a training option for more experienced dancers who want to dive deep into zouk technique best practices.


