
Ankle Stability Conditioning Drills for Dancers
Because zouk is a dance that emphasizes keeping weight in the balls of the feet (requiring a lot of calf strength to keep the heels off the ground), and frequent pivots and turns (requiring strong stabilizers in the inside and outside of the ankle), our ankle muscles need to be hella strong to help us balance and keep our ankle joint safe and injury-free when dancing.

My post dance recovery routine
I’m actually writing this post after having gotten a (mild) outer ankle sprain injury from over training, and am now enthusiastically spreading the gospel of ankle conditioning drills that you can do to prevent this kind of injury. I thought I was doing plenty of “ankle conditioning” drills already: I was doing at least 5 minutes of dedicated ankle work, like relevés and heel lifts, almost every day. Those drills were great for strengthening my calves, improving my toe point, and giving me more control in my weight transfers, but weren’t doing much to strengthen the stabilizers on the outside of my ankle. So it’s not super surprising that the muscles I was ignoring in my training eventually got cranky!
Important disclaimer: I’m not a medical professional, nor do I play one on TV. These drills are not meant for healthy (uninjured) ankles. If you have an ankle injury like I do, see a physical therapist (they are the bomb!)
Ankle Anatomy 101
Our feet and our ankles can be surprisingly complex - one foot alone has 28 small bones, all held together by connective tissue and muscles. On the plus side that makes our feet super flexible, but on the minus side, that extra mobility puts us at risk for injury - especially when we’re heaving our entire bodyweight around over our dainty little ankles!

Going through all the bones/ligaments/muscles of the ankle and foot is outside the scope of this blog post, but what’s helpful to understand is we have different muscles in the lower leg and foot that help us control different ranges of motion in our ankle:
Plantar flexion - pointing the foot
Dorsiflexion - flexing the foot
External axial rotation - twisting the whole foot to the outside
Internal axial rotation - twisting the whole foot to the inside
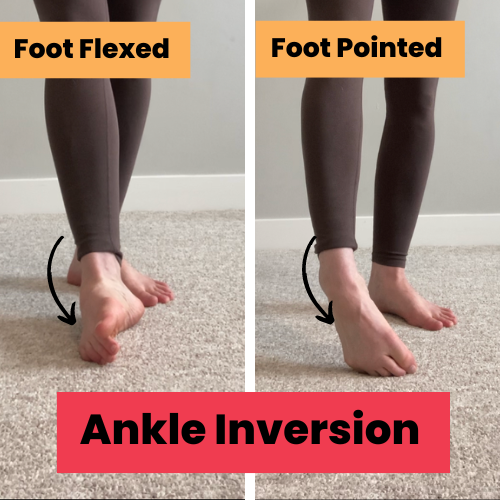
Inversion - tilting the outside of the foot towards the floor
Too much inversion can lead to injuring the outside of the ankle when those muscles and ligaments are stretched too much. This is the most common type of ankle sprain (and what I currently have)
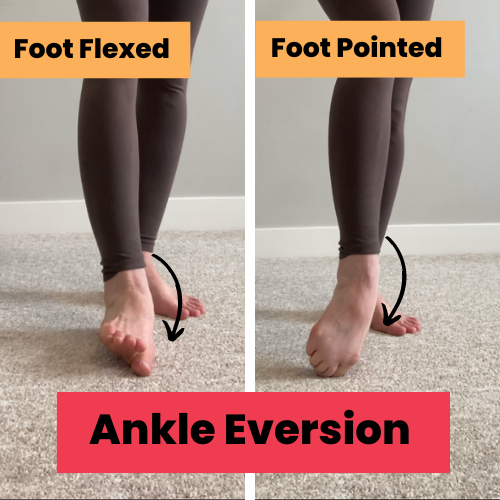
Eversion - tilting the inside of the foot towards the floor
Too much eversion can lead to injuring the inside of the ankle
For the purposes of this blog post, the ranges of motion we really care about are inversion and eversion - both of those are things we want to actively resist happening when we dance because it makes balancing harder and can lead to an ankle sprain. And don’t worry about the similar-sounding names, just know that we want to make sure we’re strengthening the both the muscles on the outside and the inside of the ankle to resist sideways wobble.
So if you have wobbly-as-Bambi ankles when you dance (click at your own risk for an example of what crap ankle stability looks like), or are looking to prevent ankle injuries - these strengthening drills are for you! Think of these like Powerthirst for your ankles (anyone remember Powerthirst??? Please comment so I don’t feel old…)

Drills to Strengthen Our Inner & Outer Ankle Stabilizers
Friendly reminder: These drills aren’t just for zouk dancers! These are totally applicable for anyone who needs to strengthen their ankles to resist inversion and eversion (aka tilting to the side), which they’re great for:
Other dancers (salsa, ballet, etc)
Anyone who does anything in heels (any dance style)
Hikers
Martial artists
Yogis
Circus artists
And more!
For most of these drills you’ll want a low-resistance fat stretchy band (like a Theraband). You can tie it into a loop to anchor it against a piece of furniture, or use your other foot to anchor the band for these drills.
1. Banded Outer-Ankle Strengtheners
These drills work to strengthen the muscles on the outside of the ankle that resist over-stretching that area.
Version 1: Foot Flexed

Start with the right leg kicked out straight, right foot flexed, with a stretchy band looped around the outside of the top of the foot. Anchor the band to the inside of the foot (either around the left foot, or to a piece of furniture) so that the band is pulling the top of the right foot to the inside (pulling it into inversion)
Resisting the tension in the band, press the outside edge of the right foot into the band, trying to push the foot towards the outside.
Hold for a second, then slowly relax the foot back to the starting position, letting the band gently pull the top of the foot back towards the middle
Repeat for 10-20 reps, then switch feet
Make sure that the “pushing into the band” movement is coming from your ankle and not your knee or your hip! Don’t let your thigh or your knee twist during this (or any of the other) exercise.
Version 2: Foot Pointed

Repeat the same drill as above, but this time with your working ankle pointed.
2. Banded Inner-Ankle Strengtheners
As a compliment to the above, these drills work on strengthening the muscles on the inside of the ankle.
Version 1: Foot Flexed

Like above, start with the right leg kicked out straight, right foot flexed, with a band looped around the top of the foot. This time we’ll anchor the band to the outside (pulling the top of the foot to the outside, into an everted position). You can cross the right leg over the left and smoosh the band into the floor, or you can anchor it to some furniture if that feels too awkward
Resisting the tension in the band, press the inside edge of the ball of the foot into the band, reaching it towards your midline (again, make sure this action is coming from your ankle, and you’re not twisting or rotating your thigh or knee)
Hold for just a moment, then with control let the band slowly pull the top of the foot back to the outside.
Repeat for 10-20 reps, then switch feet
Version 2: Foot Pointed

Same as above, but done with the toes pointed.
3. Outer-Ankle Strengthening Releves (Band Anchored to the Inside)

Start standing with your band looped around the outside of one ankle, anchored to the inside of the leg down by the floor (you may have to step the non-banded foot a little forward or backward to stay out of the way of the band). Stand far enough away from your anchor that there is already tension on the band
Keeping both knees straight, raise up onto the balls of your feet, lightly pressing out on the banded ankle to resist the band pulling it to the inside - don’t let the ankle cave in!
Then slowly lower back down with control
Repeat for 10-20 reps, then switch feet
Need to make it easier? Hold onto something for balance.
Want to make it harder? Do these on one leg! Lift the non-banded leg off the ground.
4. Inner-Ankle Strengthening Releves (Band Anchored to the Outside)

Start standing with your band looped around the inside of one ankle, anchored to the outside of the leg down by the floor. Step far enough away from your anchor that there is already tension on the band (tugging the ankle a bit to the outside)
Keeping both knees straight, raise up onto the balls of your feet, lightly pressing inwards on the banded ankle to resist the band pulling it to the outside - don’t let the ankle fall to the outside!
Then slowly lower back down with control
Repeat for 10-20 reps, then switch feet
Need to make it easier? Hold onto something for balance.
Want to make it harder? Do these on one leg! Lift the non-banded leg off the ground.
5. Releve Ankle Circles
I consider this the “Big Kahuna” of the exercises. In this drill we will let our ankles drift into inversion and eversion with control to get our muscles used to supporting weight in those positions.
Be gentle with these! Now we have our full bodyweight pressing into our ankle in these (precarious) positions, which is much more intense than the resistance band used in the above exercises. So keep these small to keep them controlled.
Note: You can even see in the GIFs for these drills how much more strength and range-of-motion I have in my right ankle vs. my left (injured) ankle - I exaggerated the ROM so you could see it better in the videos. Ideally you should try to keep the size of the movement similar in both feet!
Starting with Weight in the Outside of the Foot (Outside-In)
Start with both feet hip-width apart, both knees straight. You can choose to do this drill with feet parallel to each other, or turned out to the side (or try a couple of reps of both!) - just pick one and stick with that for this set.
Invert your feet slightly by leaning into the outside edges of your feet, trying to lift the inside edge. Keep this gentle! Only lean as much as feels comfortable/safe
Keeping the weight in the outside edge of your foot, lift the heels up - you’ll end up in a releve with more weight on the pinky-side of the front of your foot, and your ankles may even splay out to the side
Keeping the heels lifted, shift your weight to the inside of the ball of the foot (your ankles may start to splay towards the inside)
Keeping the weight on the inside of your foot, slowly lower your ankles to the floor. You should end up in an everted position (inside of the foot pressing into the floor, outside edge of the foot slightly lifted)
Roll your weight back to the outside edge of the foot and repeat
Aim for 5-10 reps
Starting with Weight on the Inside of the Foot (Inside-Out)
This is the same drill as above, but we’ll be reversing the direction of the circles our ankles make.
Start standing with feet hip-width apart (like above)
Evert your feet slightly by leaning into the inside edges of your feet, trying to lift the outside edge of the foot away from the floor
Keeping the weight in the inside of the ball of your foot, lift the heels up - you’ll end up in a releve with more weight on the inside of the front of your foot, and your ankles may cave inwards slightly
Keeping the heels lifted, shift your weight to the pinky side of your foot (your ankles may start to splay towards the outside)
Keeping the weight on the outside of your foot, slowly lower your ankles to the floor. You should end up in an inverted position (outside of the foot pressing into the floor, inside edge of the foot slightly lifted)
Roll your weight back to the inside of the foot and repeat
Aim for 5-10 reps