
The 3 Fundamental Types of Turns in Zouk
There are hundreds and hundreds of moves and variations within the Zouk move-o-sphere and a large majority of them have some kind of turn within them. What’s interesting is that every movement in Zouk can be broken down into a mixture of 3 components: travel, turn, and tilt. Today we’ll be diving into the turn component going over the 3 fundamental types of turns that make up virtually all of the turning variations we see in Zouk along with some important techniques for turning.
The three fundamental types of turns are:
Two footed turns (pivoting on both feet)
Single footed turns with a non-traveling (constant turning) axis
Single footed turns with a traveling axis
Turning Technique
Before we dive into each of the types of turns, let’s start with an overview of technique that applies for all turns (we’ll likely write a blog post specifically diving into the below topics in the future):
Initiating turns with a twist in the torso (chest moves before hips)
Keeping the weight in the balls of the feet (not letting the weight dump into the heels)
Keeping the hip muscles engaged so that when the hips move, the feet move.
Proper frame in the arms (if the turn is lead from the arms)
Lifting the heel while turning (it can come down when the turn stops for more stability)
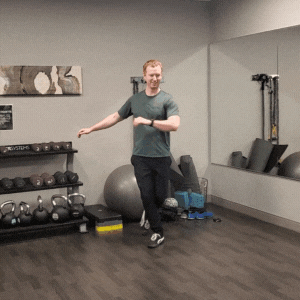
Two footed turns: the pivot
The first type of turn is the two-footed turn. In this turn the follow pivots on the ball of the both feet. This turn happens when a follow is led to turn while their weight is split between two feet (note: it doesn’t have to be 50/50 weight split, it could be 90/10, 80/20, etc.) Using BRIC terminology, these are called “driving leg turns”, because the leg that we’re turning towards initiates and helps drive the turn. So if we’re turning towards our right leg (clockwise) our right leg starts to externally rotate and that external rotation is what helps rotate the rest of the body (it’s not the only muscle working since we generally have some impulse from the twist in the chest and our other hip helps, but it’s doing a fair amount of the work). It’s worth noting that the driving leg is independent of where the weight is. Even if 90% of the weight is on the left foot, if you’re turning to towards the right foot, the right foot is the “driving leg.”
Driving leg turn (pivoting on both feet). The right leg is the driving leg in this example
single-footed turn (with a non-traveling axis)
The next type of turn is a single footed turn with a stationary axis (turning on the spot). This happens whenever the follow is led to turn while all of their weight is on a single foot and there is no traveling momentum. The BRIC terminology for this turn is a “compass turn” (not a compass to find north, a compass to draw a perfect circle):

A compass trying his best to draw a perfect circle
Here’s what the turn looks like:

Compass turn with the leg projected in front
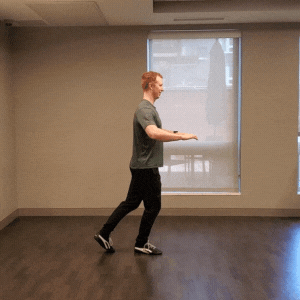
Compass turn with the leg projected behind
This type of turn shows up in many common moves such as soltinho, viradhina (when there’s a 90 degree turn added), planadas and multiple single-footed turns (which is just a planada led with one hand)
A great solo drill is working on compass turns in both directions on each foot (you can practice with the leg projected in different directions as well like shown above)
There are also some variations to single-footed turns. The first is referred to as “foot repositioning” in BRIC terminology. This most commonly shows up in soltinho:

Example of foot repositioning
This movement is actually just a quarter turn on one foot while changing the direction of the projection at the same time (and then shifting weight onto the front foot).
The second variation is the turning that happens during a counter balance. While technically a single-footed turn, in this case the follow’s center of mass is outside of the follower’s foot (which is why they feel like they are going to fall if you let go). We’ll dive into counter balances as their own topic later.
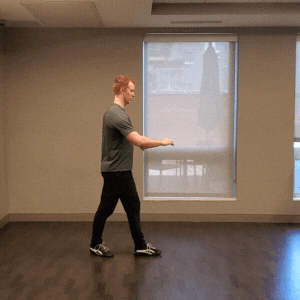
Single footed turn with with traveling axis (traveling turn):
The last type of turn is the single-footed turn with a traveling axis. In this turn there is a component of travel included with a turn so the turn doesn’t happen “on the spot”.

Single footed turn with traveling axis

Single footed turn with no traveling axis (stationary axis)
Notice how the projecting/collection happens during the turn, unlike in the compass (where the projection is constant). This is because of the travel that happens during the turn and this is what gives the turn the feeling of constant flow and makes good traveling turns feel so smooth.
This is my favorite type of turn because it shows up almost everywhere, including in yoyo, boomerang, tilted turns, and piao.
The key to mastering this type of turn is simply drilling. My favorite drill for these is to work on my traveling turns down a line using a step, driving leg, into a traveling one footed turn and then repeat.

Traveling turn down a line using steps, driving leg, and single footed traveling turns
How they work together
In practice we commonly see some or all of these types of turns show up in a single move. Let’s take yoyo for example. If we lead yoyo from a lateral entrance (cross foot entrance) the follower’s footwork is a step forward with the left, another step with the right, a 180 driving leg turn (counter-clockwise) into a traveling axis turn (still counter-clockwise), then step forward with the right and another step with the left, and finally a last 180 driving leg turn (now clockwise) which brings us back to our starting position.
Yoyo footwork using steps, driving leg, and single footed traveling turns
There we have it - the three fundamental types of turns that show up everywhere! I hope this helps you as much as it helped me. Happy turning!
Want to learn more about improving your zouk turns?
If you’re ever visiting Minneapolis, drop into one of our classes at AmoZouk! In our group classes we break these 3 types of turns down into simple to follow drills and demonstrate how they can be applied. We also offer private lessons.
And if you’re a super nerd like me and want a deep technical dive into lead and follow technique including turns, check out Bruno & Raiza Improvement Course (BRIC) Level 1 - they do an amazing job of breaking down the fundamentals of zouk technique and it’s where I learned many of the above tips. I highly recommend it as a training option for more experienced dancers who want to dive deep into zouk technique best practices.