How to “Engage Your Hips” In Zouk (Pt 2): Keeping Level Hips
Note: This is Part 2 of a 2-part series on hip engagement in zouk dancing. If you haven’t already read it, I suggest you check out Part 1 here:
Part 2: How to “Engage Your Hips” In Zouk (Pt 2): Keeping Level Hips (this post!)
To Tilt Or Not To Tilt - That Is the Question
Unlike in other popular dances such as salsa, there is no contra-lateral hip motion (as a default movement pattern, it may be added in as a styling choice) in zouk. That means engaging the muscles on the outside of the hips to resist unwanted side-to-side hip tilt when dancing.
Note: there are multiple schools of thought when it comes to letting the hips tilt side-to-side (or not) as part of our default movement pattern in zouk. I am a fan of the “no tilt” as a default, so that’s the context I’ll be using in this post.
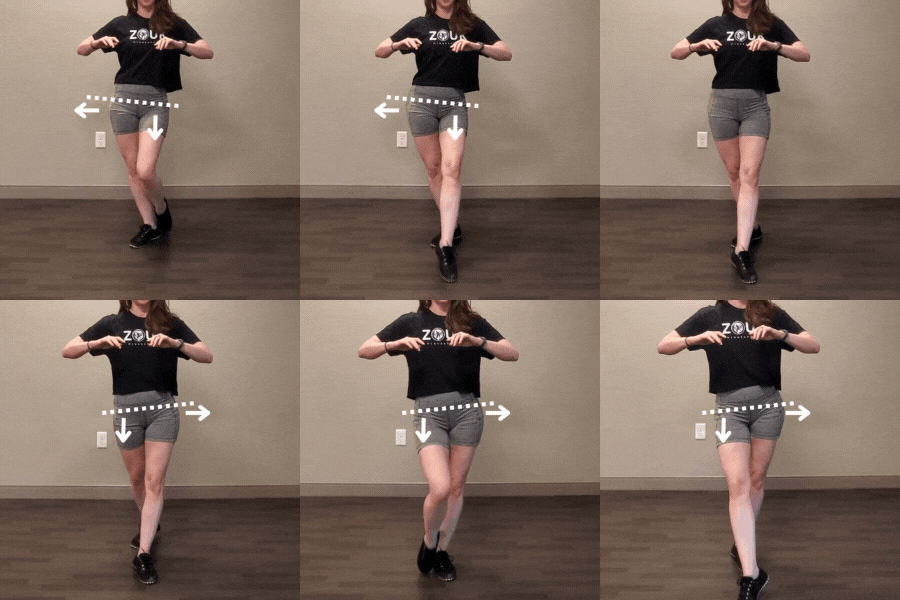
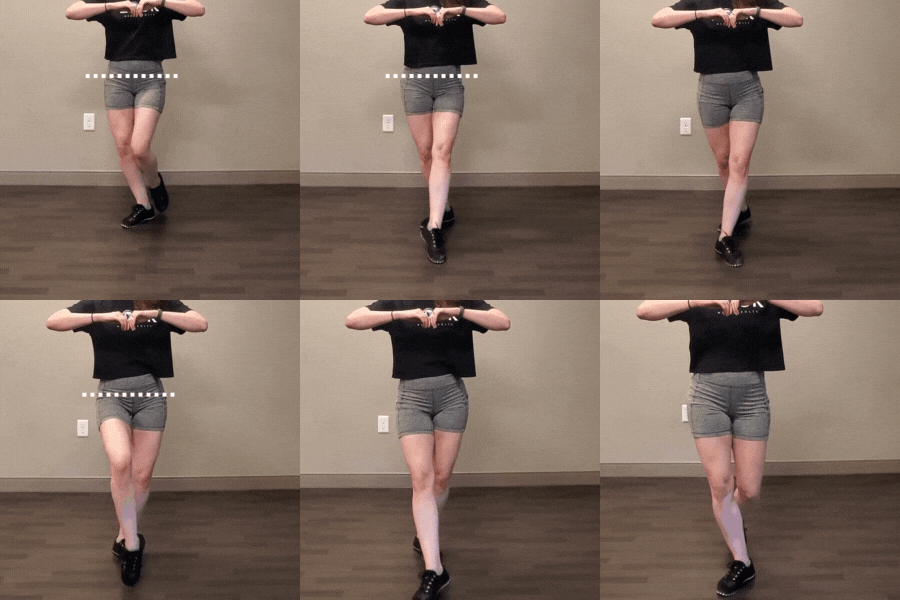
Let’s take a look at what this could look like in a simple forward walk:
Hips tilting while walking forwards - notice how the back-leg hip drops as soon as weight is shifted to the front foot
Hips staying level (mostly!) while walking forwards - notice how much smoother the movement looks
Some of the reasons having neutral, level, non side-to-side-swaying hips in zouk can be beneficial are:
It requires more engagement through the outside of the hip, therefore helps provide more stability and balance
It reduces the chance of “hanging” (disengaging) in hip joint, dumping our bodyweight into putting too much pressure on the ligaments and connective tissue in our hip (aka injury prevention, especially for hypermobile dancers!)
It can allow a “quieter” or “less noisy” connection in close embrace (similar to how we want to avoid doing “choo choo” arms and introducing too much noise in the arms)
Kuna Malik Hamad is a great example of a zouk lead who DOES use hip tilt intentionally (and comfortably!) in their dancing
That said, there are lots of instructors who are proponents of using the hip tilt as a component of elasticity and energy absorption (Kuna talked about this quite a bit when he was here for a weekender earlier this year, and he has some damn comfortable hips!). But even if you are on Team Tilt, it’s important to know what muscles to engage to dampen the tilt, so you can control the speed and force of the movement, and not just swing your hips loose-y goosey.
Anti Tilt Muscles: Hello Abductors
I don’t have a stock photo license that shows all 3 of these abductor muscles separately, so just recognize that they connect the outside of your hip bones to the outside of your leg :)
The main muscles that help keep our hips level when we are walking, dancing, or simply shifting our weight side to side, are our abductors (fancy name for “muscles that pull the leg open out to the side”). The three primary outer-hip muscles that we want to be able to engage are:
Gluteus medius
Gluteus minimus
Tensor fasciae latae (TFL)
(There are a handful of other muscles that can also assist with this range of motion, but that’s beyond the scope of this blog post)
What we care about from a biomechanics perspective is knowing how to engage (contract) these muscles when we are shifting weight from one foot to the other to prevent one side of the hips from dropping when the “support” of the foot is gone.
How to Find Your Abductor Muscles
Start standing in a comfortable position, with your hips level
Keeping your hips level, lift one foot off of the ground (but don’t let it touch the other leg - float it somewhere in space)
Tada! You should feel a squeeze in the muscles in the outside of the standing leg helping keep the hips level. Those are your abductors.
Conditioning Drill: Belly Dancer Hips
(Note: this is NOT actually the technique belly dancers use to lift their hips, I just call this drill that because it reminds me of belly dance hip isolations!)
This is a great drill for learning to engage your gluteus medius and gluteus minimus, the primary muscles on the outside of your hip that help keep your hips level (resist tilting side-to-side salsa-style) when zouking.
You’ll want to be able to see yourself for this exercise, so practice in front of a mirror, or set up your phone as a selfie camera to check your hips as you go.
Start standing on the left foot, with the left leg soft (aka the knee just a wee bit bent) with the right leg lifted low in front of you (don’t rest the right foot against the left leg - that’s cheating!). You can gently rest your hands on a chair or a wall for balance if needed. Make sure your hips are level
Keeping the right leg lifted, slowly drop the right hip down towards the floor. This should feel a bit like you’re “hanging” on your left hip
Biomechanically speaking, this is a position that is stretching our left glute min and glute med, the muscles on the outside of the hip
Then slowly and with control lift the right hip back in line to level with the left hip
Continue to lift the right hip up (higher than the left hip) - but think about initiating this movement by pulling the outside of the left hip down towards the outside of the left leg. Our goal is to make sure the hip tilt motion is coming from the muscles on the outside of the left hip and not the obliques on the right side of the body. If we only think “let me hike the right hip up,” often the default action of our body will be to side-crunch using our abs (which are not the muscles we’re trying to target right now). You can place a hand on the outside of the left hip to double-check that you feel a good strong squeeze there while you’re trying to lift the right hip
Biomechanically speaking, this position is contracting the left glute min and glute med, pulling the outside of the left hip lower towards the thigh, which is what’s lifting the right hip higher
Continue, lowering and lifting the right hip focusing on using the muscles on the outside of the left hip for 8-15 reps, then switch legs
Too Much of a Good Thing: Engage Your Inner Thighs Too!
The amount of outer hip (abductor) engagement we want in zouk is just enough to keep our hips level when we are lifting a foot off the ground to step. If you over-engage the outside of the hips, you’ll actually be tilting your hips in the other direction, or slightly pull the leg out to the side, leading us awkwardly to “John Wayne” walk with the legs (Nate talked about avoiding this and the importance of stepping in a straight line in his post last week about tips to improve your zouk footwork - this one was #6).
To combat over-engaging the outside of the hips, we can just add a slight inner thigh squeeze. For follows especially, this will help us continue to be able to step in a straight line on our “track,” AND help keep our leg in a predictable position when doing single footed spins.
Practice Drill #1: “Freeze Dance” A Zouk Video
This is one I mentioned earlier this week in my post on hip turn out engagement - check out that post if you haven’t read it yet. The “freeze dance” video is a great way to visually spot wtf your hips are doing at a given moment in your dance.
Practice Drill #2: Walking with Hip Engagement
I have to give credit where credit is due: this drill is straight out of Level 1 of the Bruno & Raiza Improvement Course (BRIC) we did in Calgary earlier this year (10000% recommend, easily the most valuable zouk training I’ve ever done).
“Just walking” may sound simple - but we spent literally hours working on being able to maintain this hip engagement and it is hard if you’ve never done it before! It’s been so helpful that me and my partner Nate include in our warm up every time we train together. By warming up our hip engagement in a less complicated range of motion (walking), it’s then easier to engage them when we move on to our more complicated practice moves/drills (ex. traveling turns, adding tilts and head movement).
Followers: Use a Partner
I suggest starting with this drill using a partner for support - if this is too easy, then you can move on to the “challenge” version without a partner
Start standing in an open frame connection, holding hands (this will allow you to stay farther apart from your partner so they can watch your hips
Have your leader lead you through a variety of foot projections and weight transfers, all the while watching your hips, and verbalizing when they see the hips tilt:
Walking forwards: shift the weight to one foot, project the other foot forwards (this is where we have a tendency to drop our hip!), shift the weight to the new foot (this is another opportunity for accidental hip tilt), and collect
Walking backwards (the same as above, but projecting and weight transfering backwards)
Projecting to the side: shift the weight to one foot, project the other foot to the side (this is where we have a tendency to drop our hip!), shift your weight to the new foot (still keeping those hips level!), and collect
Go SLOW AF. Don’t do your zouk basic step or zouk timing. Heck, don’t even listen to zouk music. Throw on some lofi beats, or whale sounds, whatever floats your boat.
Challenge FOR LEADERS & FOLLOWERS: Try it Solo
In this drill, you’ll do the same practice projecting your feet, then shifting our weight as above - but now without a partner to help balance us. It can still be useful to recruit a partner to watch your hips and give you verbal feedback when they see too much tilting, but you can also film yourself and re-watch the video.
Make sure you practice:
Forward projection + weight shift (step)
Side projection + weight shift (step)
Backward projection + weight shift (step)
So… It Sounds Like We’re Supposed to Engage All the Things?
To recap, in these last two posts we’ve talked about engaging:
Our hip external rotators (the glutes and the deep rotators, aka the “deep butt”)
Out hip abductors (the outer hip muscles)
Our hip adductors (the inner thigh muscles)
Does that mean you should be squeezing everything all the time to the max? Absolutely not (unless you want to feel stiff and look constipated).
A huge differentiator of comfortable zouk leaders and followers is the ability to use the minimum muscle force necessary to accomplish your goals. That’s why dancing with a high-level zouk dancer can feel so effortless and magical - they are only exerting as much effort as they need, no more (even for leaders who prefer to lead with more “tone” or tension). So while you may be exaggerating the amount of muscle contraction/engagement you are using as you are starting to find these muscles, and learning to keep them engaged as you’re stepping/dancing, over time our goal is to dial-down the intensity of the contraction so we are using only the minimum amount to prevent our hips or legs from internally rotating or tilting unintentionally.


